
Queria agradecer a todas que participaram do concurso de nail art. Gente, fiquei de boca aberta coma quantidade de fotos,e já estou desesperada pensando em como vou conseguir escolher só uma ganhadora! Vamos ver se daqui para próxima semana sai o resultado.
I'd like to thank everyone that entered the nail art contest. I am overwhelmed and impressed with the number of entries, and I really don't know how I', going to pick just one winner. I'll try to post the results by next week.
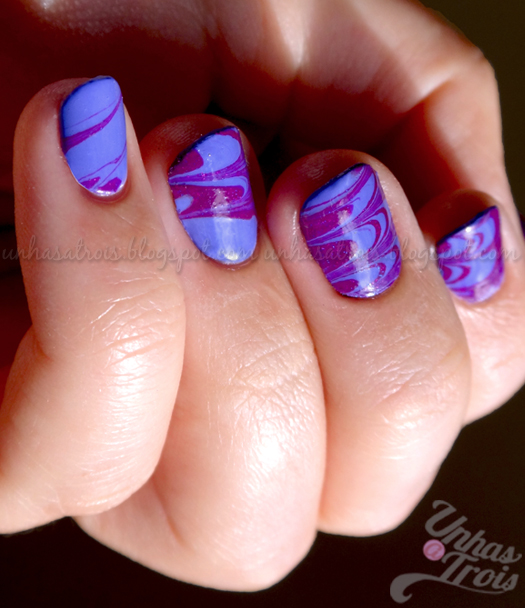
Hoje trago o prometido tutorial do dry marble. Depois que fiz essas unhas aqui, algumas pessoas ficaram bem curiosas, e queriam saber como eu fiz.
Descobri um jeito bem fácil de imitar o efeito do water marble, mas sem ter que usar água. Ralei um pouco pra descobrir o jeito certo de lidar com o esmalte, mas acho que agora já dá pra conseguir resultados bem satisfatórios e sem aquela meleca da água com esmalte.
Today I have the tutorial I promised a while ago on dry marbling. After I did this mani, a few people were curious as to how I achieved the water marble effect without using water.
It was a lot of experimenting that led me to this technique, and I think I've finally found a successful way to imitate the water marbling effect without the mess that water + polish involves.

Dry marble não requer água, mas para conseguir aquele efeito bem natural e cheio de curvas, vamos precisar de alguns materiais bem importantes.
Dry marbling doesn't require any water, but you'll need a few things in order to achieve that cool swirly look.

Vamos precisar de:
- Thinner (diluente) específico para esmalte (Não sei se óleo de banana serve por que nunca testei. Mesmo usando thinner o esmalte seca depois de alguma horas, e isso é bem importante).
- Esmaltes de sua preferência (usei Pucci-licious da Color Club e Flying Dragon da Chna Glaze).
- Palito de laranjeira ou pincel bem fininho.
- Saquinho zip-lock (ou qualquer tipo de plástico que não amarrote nem rasque com facilidade).
- Papel vegetal (opcional, usei no tutorial para facilitar a visualização, mas pode ser usado no lugar do zip-lock).
You'll need:
- Nail polish thinner.
- Nail polishes of your choice (I used Color Club Pucci-licious and China Glaze Flying Dragon).
- Orange stick or thin nail art brush.
- Zip-lock bag.
- Wax paper (optional, I used for the tutorial so the picture taking would be easier, but it can be used in place of the zip-lock bag).

Como fazer:
- Pingue generosamente o thinner (diluente) na superfície de sua escolha (plástico ou papel vegetal).
- Pingue algumas gotas da primeiro esmalte escolhido.
- Espalhe o esmalte na superfície, misturando com o thinner. Crie uma área de tamanho suficiente para cobrir quantas unhas você desejar.
- Pingue algumas gotas da segunda cor de esmalte.
- Espalhe o esmalte para "abrir" a cor.
- Dependendo de quantas cores você decidir usar, comece a pingar espalhar as outras cores em ordem de preferência.
- Depois de pingar todas as cores desejadas, a imagem do "alvo" deverá estar pronta para você criar seu desenho. Obs: É normal o meio do "alvo" estar mais grosso por causa do acúmulo de esmalte.
- Com o palito de laranjeira ou um pincel bem fininho, comece o desenho de sua escolha. Eu comecei puxando uma linha de dentro para fora. Limpe o palito.
- Repeti a puxada de dentro para fora, agora do lado oposto. (Essa técnica aprendi assistindo os vídeos da Colette do My Simple Litte Pleasures no YouTube, e resolvi aplicar ao dry marble).
- Escolha o desenho que você quiser, e use o palito ou pincel para arrastar o esmalte, sempre limpando a ponta depois de qualquer puxadinha. Aqui eu puxei de uma lado para o outro deixando um espacinho entre cada puxada.
Depois de conseguir o desenho que você quiser, deixe secar durante algumas horas. Eu deixo de um dia para o outro, por que o esmalte precisa estar bem seco para podermos descolar o desenho do plástico.
Tutorial:
- Put a generous amount of nail polish thinner on the surface of your choice (zip-lock or wax paper).
- Start with your first color choice, and add a few drops to the thinner.
- Using the brush, spread the nail polish, mixing it with the thinner, and creating an area large enough to cover however many nails you want. I usually make enough for one hand at a time.
- Add a few drops of the second color choice.
- Spread it around to "open up" the color.
- Depending on how many colors you use, start alternating the drops in the order you like.
- After adding all the drops and creating the "bullseye" image, you can get ready to start your design. Note: It's normal for the center of the bullseye to be thicker due to the amount of polish that gets concentrated in that area.
- With an orange stick or thin nail art brush, start the design you like. I did a stroke from the center to the outside. Clean your stick or brush.
- I did the same stroke, but on the opposite side. I learned this technique by watching My Simple Little Pleasure's videos on YouTube, and decided to apply it to the dry marbling.
- Pick the design you want to make, and do the strokes that will help you achieve it. Remember to always clean the tip of your stick or brush before each new stroke.
After creating the desired design, let the polish dry overnight. It needs to be completely dry before you remove it from the plastic surface.
Considerações finais e Dicas:
- Talvez você não consiga fazer um desenho legal na primeira tentativa. Eu fiz várias tentativas até pegar a manha. Não desista, continue tentando.
- Tenha algum tipo de plano para o desenho, desse jeito você não fica perdida fazendo movimentos aleatórios com o palito.
- O thinner é o elemento mais importante dessa técnica. Ele substitui a água, e dá um pouco de movimento ao esmalte.
- Quanto mais thinner você usar, mais fino o esmalte vai ficar. Se o esmalte ficar fino demais você vai perder o controle sobre o movimento do esmalte, e ele vai ficar escorrendo pela superfície.
- Plástico é melhor superfície para se trabalhar por que facilita o movimento do esmalte, e na hora de descolar o desenho seco fica bem mais fácil. O papel vegetal é um bom substituto se você não tem plástico, mas na hora de descolar o desenho, o papel dá uma rasgada e isso deixa o desenho mais grosso e mais trabalhoso de aplicar na unha.
- Assista tutoriais no YouTube e descubra que movimentos são necessário para conseguir tal desenho. Aplique os mesmo movimentos com essa técnica, e tente passar o palito ou pincel o menor número de vezes possível para não misturar as cores umas nas outras.
- Crie uma área relativa às unhas que você irá decorar. Eu geralmente faço o desenho para uma mão toda, mas você pode fazer para uma unha, duas unhas, etc.
Final Considerations and Tips:
- You might not get this on the first try. I tried several times before I got the hang of moving the polish around. Don't give up, keep trying.
- Have some sort of plan for the design, this way you won't get lost making all kinds of random movements and risk ruining the marble look.
- The nail polish thinner is the most important element for this technique. It substitutes the water in water marbling, and gives movement to the nail polish, letting you drag it around to create designs.
- The more thinner you use, the runnier the polish will get. If the polish gets too runny, you'll loose control over the design.
- Plastic is the best surface to work on because nail polish glides on it, making it easier to create designs. Wax paper is a good alternative if you don't have zip-lock bags around, but you'll have to work a little harder to drag the polish. Also, removing the dry design from plastic is much easier than removing it from wax paper. My wax paper always rips and leaves some residue under the design, making it thicker and therefore harder to apply to the nail.
- Watch tutorials on You Tube and learn what kinds of movements create what kinds of designs. Apply the same movements to this technique. The less you run your stick or brush through the polish, the less mixing of colors you'll have.
- Spread the first polish enough so you can create a surface that can be used for the number of nails you wish to decorate. I usually do enough for one hand, but you can do one finger at a time, or more.
Como esse post já está longo demais, amanhã eu volto com a segunda parte do tutorial que vai mostrar como aplicar o dry marble nas unhas. Então por favor voltem amanhã ok?
Também queria pedir para vocês me darem feedback. Esse tutorial foi claro? As fotos explicam o passo-a-passo direitinho? As explicações estão fácil de entender?
Eu procurei muito na internet um tutorial de dry marble que conseguisse replicar o que o water marble consegue fazer, e até hoje não achei nada. Por isso resolvi testar até conseguir o efeito que eu queria. Obrigada por ler!
Since this post is already really long, tomorrow I'll post another tutorial on how to apply the dry marble onto your nails. So come back tomorrow and check it out!
Please let me know if this was helpful in any way. Also, I'd love some feedback from you guys. Was this tutorial clear? Are the pictures explanatory? Please let me know.
I've looked around for a long time, and I could never find a dry marble tutorial that could recreate the designs achieved with water marbling. This is why I decided to try this thing until I mastered it. Thanks for reading!
